How to make a user flow diagram
Don't start by creating a user flow diagram based on your best guess. Instead, use data to inform your process. Follow these steps to gather the information you need to make accurate user flow diagrams.
1. Determine your objective and your users' objectives
You can't give directions if you don't know what the destination is. Similarly, you can't create a user flow until you determine where you want your users to end up—and more importantly, what your users ultimately want from your app or website.
You're likely aware of your company's objective, which could include convincing users to purchase a product, sign up for a newsletter, or download a piece of gated content, but it might be less clear what users come to your site hoping to achieve.
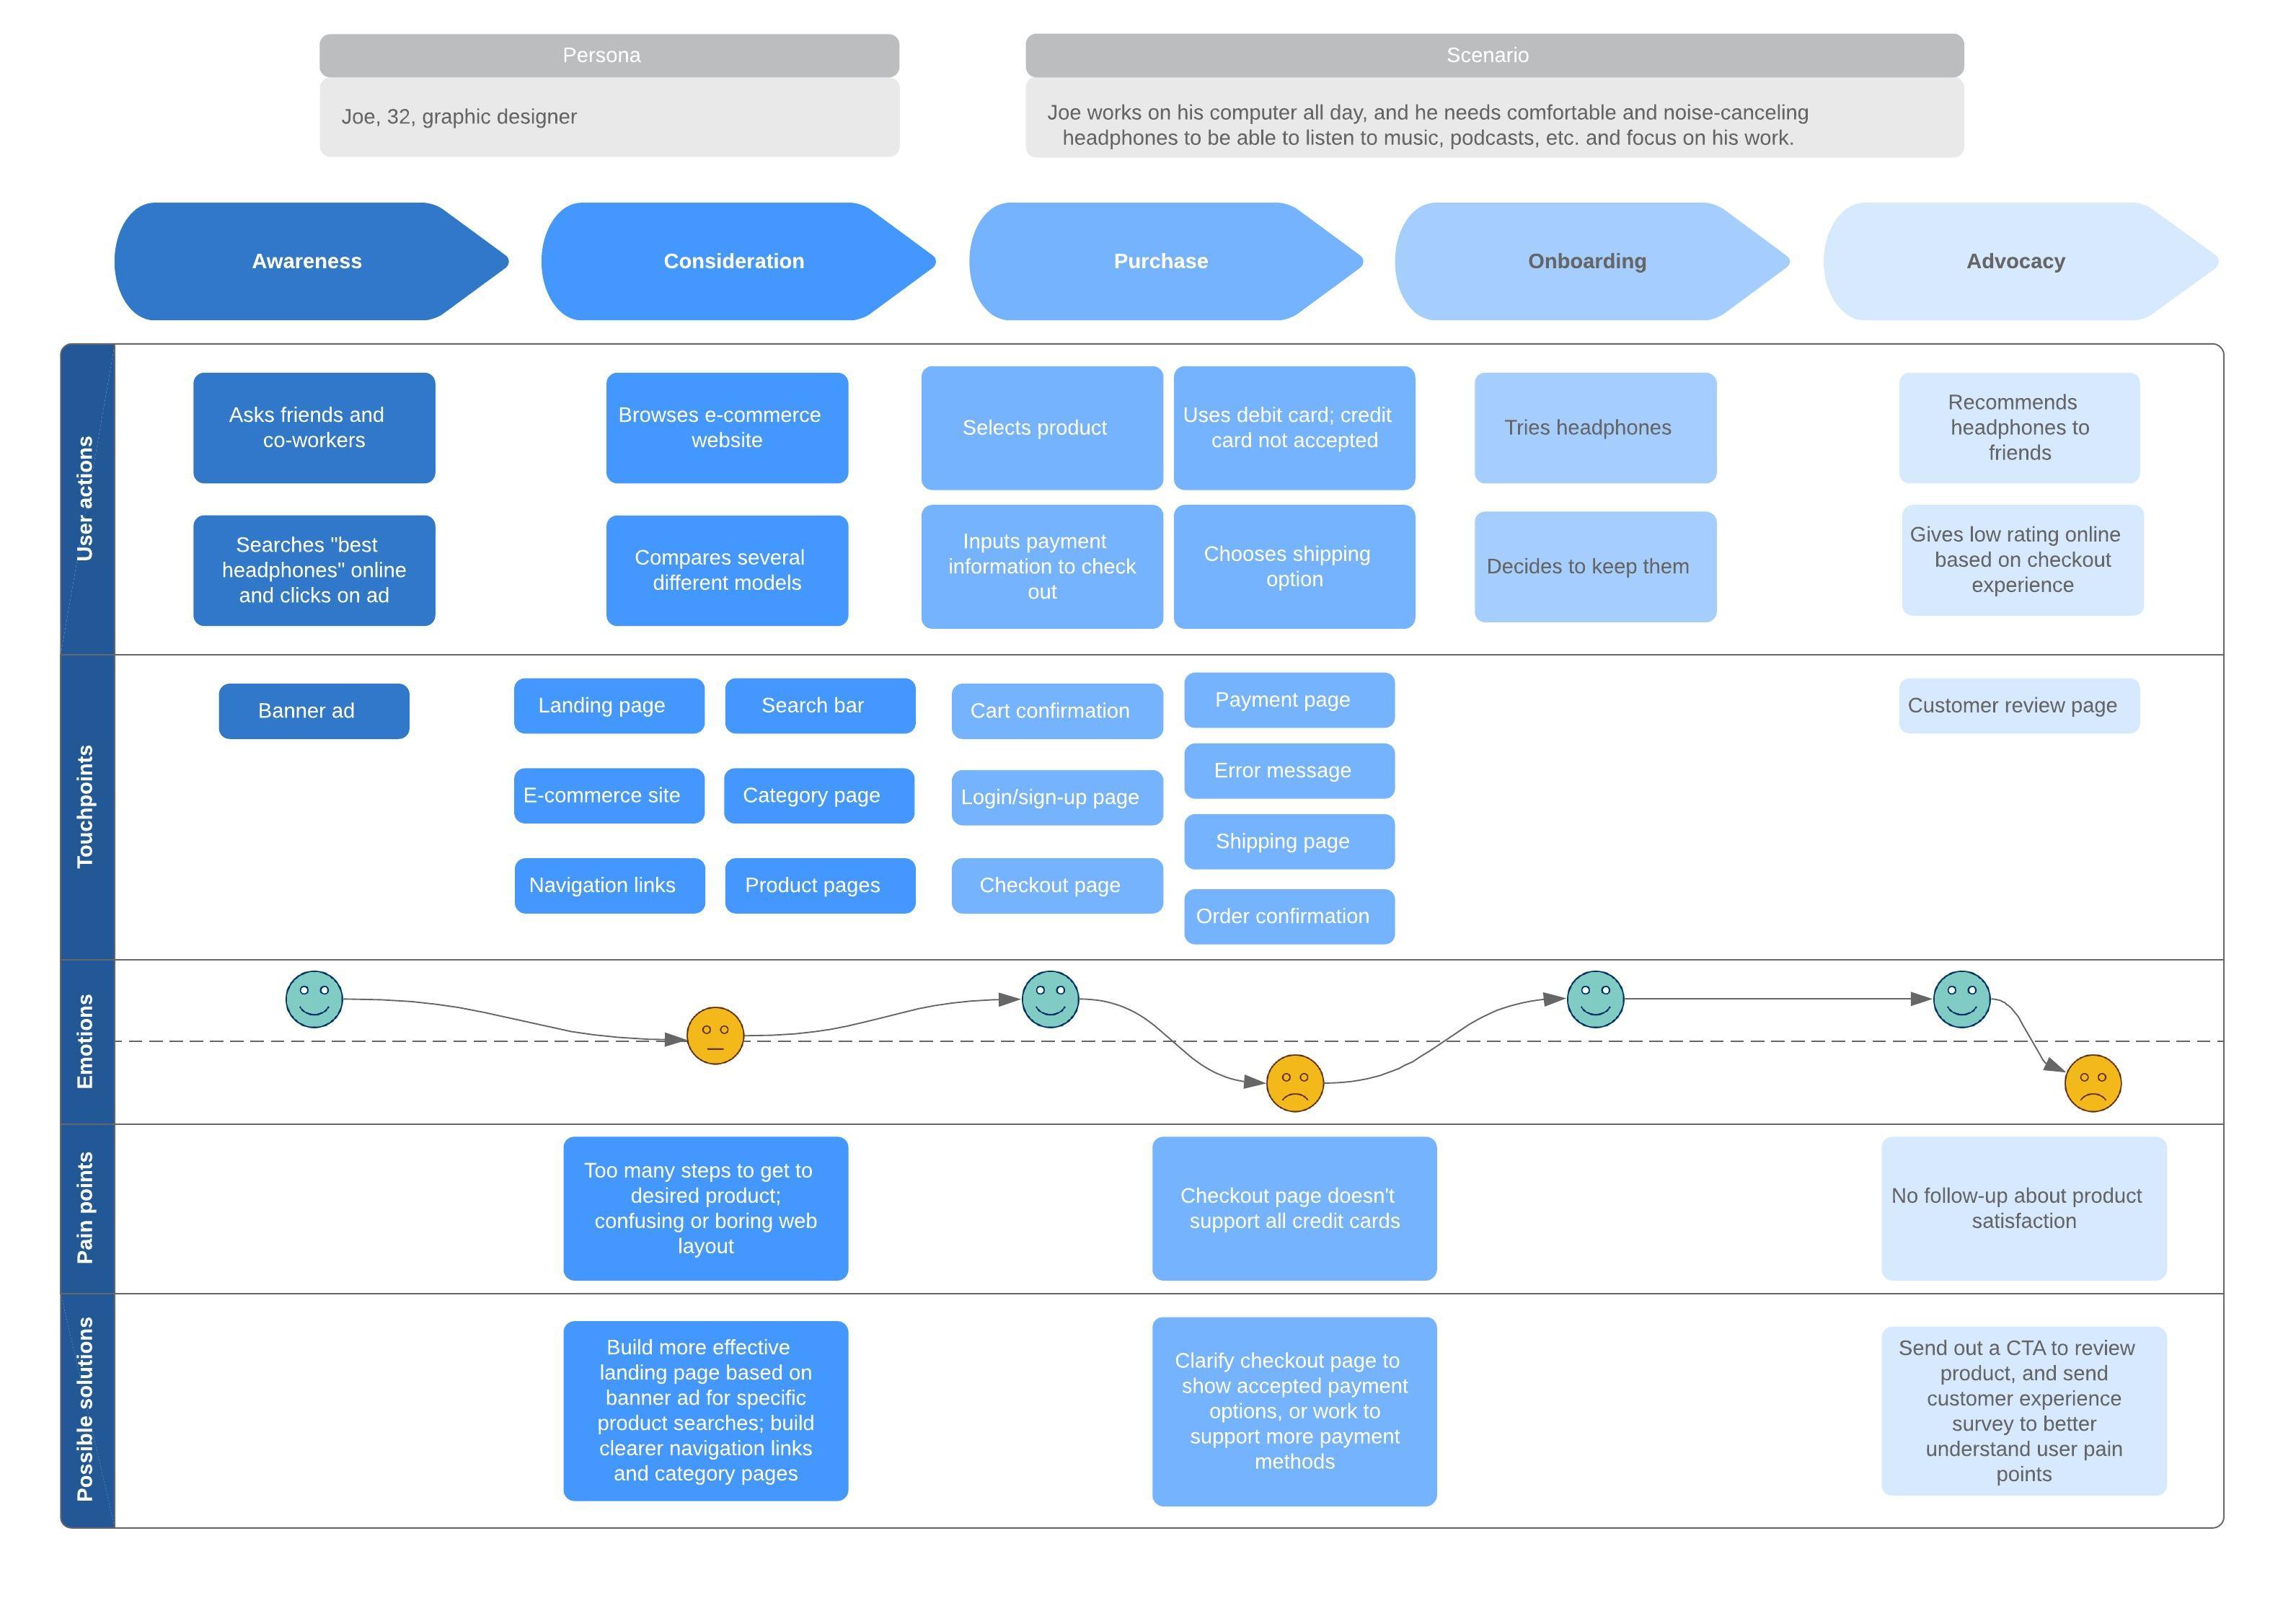
If you haven't already, create a customer journey map to give your company a shared vision of what the customer experience should be. It visualizes how a customer feels at different stages of their journey and what touchpoints they might encounter. Customer journey mapping software will reveal how your users enter your site, what they do once they're there, and what they do when they leave.
Insert customer journey map template with caption: This free customer journey map template will help you and your team clearly visualize the process of your customers’ experience with your company.
If your flow supports a complex feature set, such as single sign-on (SSO), enterprise permissions, or subscription states, define success criteria for those scenarios up front as well. Otherwise, the ideal path may look great while edge cases quietly break the experience.
2. Determine how visitors find your website
If you're trying to improve a website or app that's already built, dig into the data. Google Analytics will break down the percentages for each of the following entry methods:
-
Direct traffic
-
Organic search
-
Paid advertising
-
Social media
-
Referral sites
-
Email
Consider what these different entry points say about your users and how you can better adapt the experience to what they need. These entry points will be the start of your user flow diagram.
3. Identify what information your users need and when they need it
Now that you have a starting point, consider what information your user needs and what actions they should take. To convert users, you'll deliver them the right information at the time they need it most.
Be sure to ask yourself questions as you create your user flow diagram to get into your customer's mind, such as "What action should I take on this page if I were my customer?" "How do I navigate the checkout process?" and "If I were this customer, how would I feel about this testimonial video?" Consider what the customer wants from a particular page, what they may be feeling, and the mindset they're in.
If you're optimizing an existing website, look at what's working now. In other words, when people buy or perform other successful activities, what paths have they taken through your site? Don't focus only on the purchase; it may take several visits to a site before a customer completes a sale. However, if a visitor signs up for your newsletter or submits text notifications via a pop-up, that counts as a success.
This is also the moment to inventory less common but high-impact paths, such as password resets, expired trials, failed payments, account merges, permission errors, and other exceptions. These are the scenarios that tend to live in people's heads (or scattered notes) until a diagram forces them onto the page.
4. Map out your user flow
Now that you know your audience, their motivations, and the typical paths they follow to perform various actions, you can begin creating a user flow diagram. Choose a visual workspace, like Lucidchart, where you can easily drag and drop shapes into the user path and notate opportunities to delight and inform your customer.
Start with shapes that indicate entry points, such as organic or paid. You can even use low-fidelity wireframe shapes here, instead of just geometric shapes, to give an idea of what the site or app should look like and where your calls to action live.
Next, determine what the landing page will be and what decisions your customer will have to make on that page. Add additional shapes and decision points until the flow is complete.
Strive for completeness without unnecessary complexity. Include every detail required for your audience to make informed decisions, but avoid clutter that makes the flow difficult to scan. The level of detail you provide should depend entirely on your stakeholders:
-
High-level views: Executives may only need a broad overview of the user journey to understand the business logic.
-
Technical specifics: Engineers often require granular details, such as system conditions, queries, or API touchpoints.
Integrating wireframes into your user flows helps connect the UI to the underlying system logic, making it easier to validate that each screen supports the next step. In many cases, a series of wireframes can imply the necessary code, reducing the need for lengthy written descriptions.
However, prioritize efficiency over exhaustive documentation. If your team shares a standard vocabulary for components, naming the pattern may be more effective than embedding every image. Adjust your level of visual detail to ensure the diagram remains a helpful resource rather than a burden. And remember: Your user flow diagram may change over time as your audience evolves and their motivations for navigating your site shift.
5. Gather feedback, finalize, and share
If you're building a new site or application, share your user flow diagram with other stakeholders to gather feedback and make adjustments. This visual is especially powerful in this circumstance because stakeholders can understand the experience you're proposing at a glance.
Once you have finalized the user flow diagram, share it with UX designers, web developers, software engineers, and other team members to provide context before they start building or designing your website or app.
It’s easy to get feedback on specific parts of a diagram when you design user flows in Lucidchart. Simply leave sticky notes or tag coworkers in comments to collaborate in real time or asynchronously.
Plus, Lucidchart serves as a single source of truth from the moment you start a project until the day your code is released. If your team uses project-tracking software (such as Jira and Confluence) or knowledge-sharing tools, consider embedding the Lucidchart diagram in those tools so it stays close to tickets and documentation. With a two-way sync, anytime you update your diagrams in Lucidchart, they update automatically wherever they’re embedded, so teams are always working off of the most up-to-date information.